I’m back! And here’s the plan for this month. I kept it down to 5 beads because I think this is going to take me forever. I am not, however, afraid of a challenge, and I think this will be a great measure of how far I’ve come during this study!
Again, Ojime beads were decorative beads made from all sorts of materials during Edo-era Japan. For my designs, I not only referenced actual Ojime beads but also other ceramic artworks from the same period. The first two beads (from left to right) are drawn directly from two artworks that you can find in this month’s gallery section, so go take a look!
It’s finally time to enter the concluding month of my independent study. I’ll save the mushy stuff for my actual last post (coming soon!), but for now, an update on April’s beads!!
As lovely as they turned out, I fought long and hard with these beads to try and shape/glaze them the way I wanted. The art of the satin glaze unfortunately eluded me, resulting in my first real fail of this entire project. The glaze–as I’m sure you can see in the picture above–was adequately opaque, but somehow manifested a patchy and chalky texture that was not at all my goal. I’m a little bummed out to be honest. I really wanted this exciting new glaze to work out, but you can’t win ’em all. Other than that, I’m extremely pleased with the shapes of the beads and the carved aspects of some of the larger biconal beads. I dug grooves into those beads when they were still wet to give myself an outline for the black and white design, then scraped the glaze out of the indents as needed during the actual glazing process to make sure the marks shined through.
For my final month of bead-making, I’m taking us to Japan! I saved a real whopper for last, and you’ll see why. The beads I will try to replicate this month are called Ojime beads, a traditional type of Japanese decorative bead used to adorn ropes and secure cords. From what I can gather, these beads seem to be a great deal larger than most of the beads I’ve done thus far, and I’m excited to try to get more decorative and intricate with my designs given this extra surface area! The Met had some great examples of Ojime beads on their website (seen below) that I’ll definitely be drawing inspiration from.
I still have to make my specific plans for this set, but I predict that this will feature fewer beads than normal both because of the time constraints on me (I’m graduating soon!! Yippee!!) and the size of these beads (not to mention the level of detail). I’ll be back with those plans as soon as I have them. Smell ya later!
Welcome back! I know I put off making this post for a while, but that was because I assumed I had taken photos of all of my beads already, and could therefore make this post whenever I wanted. Wrong! I took exactly one picture of my beads! I wish I hadn’t done that!
Nonetheless, here are my fun accent beads for this month’s design. The other beads that I didn’t grab pictures of are a collection of flat disc beads and two (larger than intended) segmented beads. Carving out the little “v” patterns on the center two beads was SO tedious. If you ever find yourself carving little designs into clay, I really recommend using both a scraper tool and some slim smoothing tool with a silicone end to blend out the rough edges. Shaping the beads themselves was the easy part, and I started with a standard sphere and worked from there for both shapes. I think you can figure out how to get the squash-esque shape, but for the biconal beads I rolled the sphere between two fingers on each hand. The gap between your fingers will create that lovely ridge around the middle, just be careful you don’t smush the ridge when you put the bead down!!
I’ve ordered a special black glaze that I hope will come in this week. I’ll be back with more updates when the glazing process is complete, see ya!
Veni vidi vici, or whatever. After many trials and tribulations this past week, I finally emerged victorious with my komboloi beads. Let me recap the whole process so you can all understand the comedy or errors that went down in the art room:
First of all, even after spending hours last week making the holes on these beads bigger, most of them still ended up too small to properly fit on the bead rack I use for glazing. I’m not sure if I’ve explained this before, but you have to use a bead rack when glazing beads of else the glaze will melt and fuse your beads to the bottom of the kiln. So, after a failed attempt to drill a bigger hole in one bead (it exploded and burned my hand. Wear PPE, kids) I decided to suck it up and just shove the beads onto the sticks as hard as I could, praying they wouldn’t fall off in the firing.
You can see here that these poor beads were dangling dangerously on the edge of each rack like very small barbells. Nonetheless, luck was on my side and none of them fell off. I used the same technique I used on the test squares and gave them two coats of Carrot with one coat of Amber glaze, which actually turned out great! I’m also very proud of the glazing work I did on my owl this time around, because it wasn’t easy. You have to be really patient when you’re painting with white glaze because if you get any other color glaze on your hands and smudge the white, it’s all over.
birdie 🙂
Because of some exploded fallen soldiers (beads), I ended up with a much shorter string that I intended. I still made sure it followed the komboloi rules as a multiple of 4, but it ended up as more of a wristlet than a rosary. I’ve put the results below, so go on and check out how they ended up! These might be my favorite beads so far, and they taught me a very important lesson about clay shrinkage: make all of your clay stuff 1.5x as big as you think it should be.
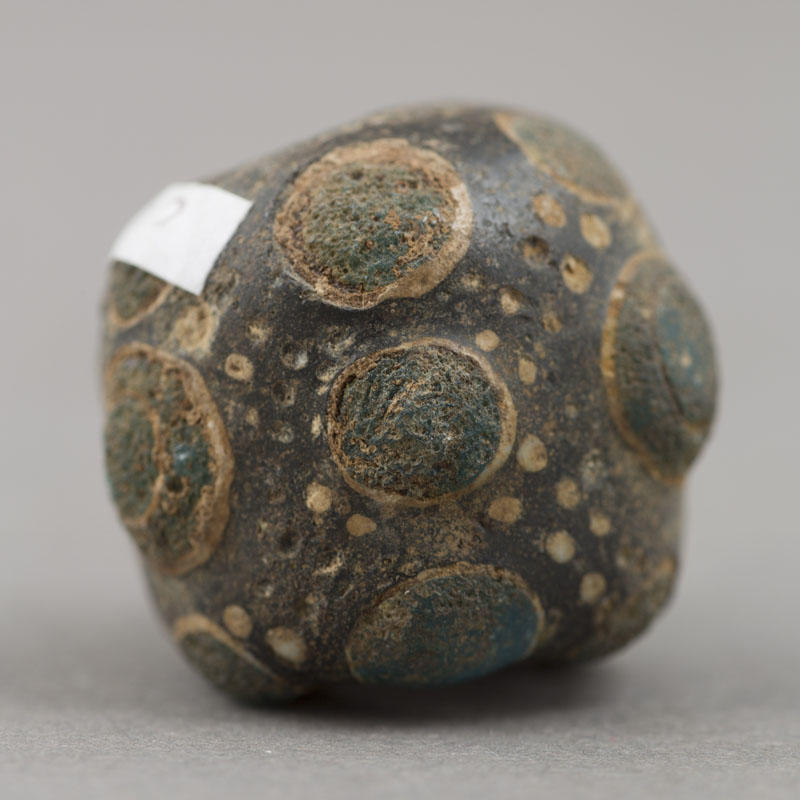
Welcome back and happy Easter! This month we’re heading over to Africa to look at the rich history of ceramic beadmaking in Burkina Faso and Mali! Particularly in the Iron Age (~1200 BCE – 500 BCE), societies across West Africa had abundant clay crafts as well as robust inter-regional trade. Sonja Magnavita’s “The Beads of Kissi, Burkina Faso” (2003) details the contents of an excavated cemetery in Kissi, including more that 4,500 beads made from shells, bone, glass, quartz, carnelian, and–yes–ceramic. It seemed that ceramic beads from before the 9th century came in barrel and cylinder shapes whereas after they commonly took the form of segmented units of 3-8 beads (figures 5-6 shown below).
While archeologists know that ceramic beads were used frequently in necklaces, anklets, and waist beads, Magnativa’s team had no luck finding any ceramic jewelry in situ–that roughly means “as it was left” in latin. I found it very interesting that glass beads seemed to be a marker of wealth in Burkina Faso, as Magnavita notes that glass beads were only found in graves with additional “exotic” crafts/items. Some of the glass beads from the Kissi site can be seen below:
With all of this written information gathered, I’ve also collected a handful of images from both Mali and Burkina Faso (very close together, luckily for me) for reference and inspiration. Not only can you find the images in this months Gallery tab, but I actually encourage you to go look at them! While I definitely won’t be able to replicate the intricately beaded cuff of a royal Xhosa woman, I will certainly be drawing inspiration from these images.
That’s all for now, and I’ll see you later this week (hopefully!!) with the Komboloi bead results. Cheers!
Hey gang. Disheartening news: we are behind schedule for the first time ever. I know, it’s devastating, but we will make it through this hardship to April… where we’ll be looking at African beads!!! Very exciting, almost makes you forget about the great woes of March. Basically, I should have planned a little better around our spring break week but I ended up trying to rush the whole process in two weeks instead. Don’t do that.
After drawing up my plans I realized I had no idea how to make ceramics look like amber (a traditional material for Komboloi beads), so I made an outrageous amount of glaze test squares to determine the perfect combination that would yield that nice orange glow.
secret experiments in my evil ceramics lab >:)
Featured above is LG-57 “Intense Red”, TP-64 “Carrot”, V-303 “Terracotta”, LG-65 “Amber”, and S-2729 “Citrus Splash”. I tested nearly every possible combination of these glazes on red and white clay to see what would look the best, mostly using LG-65 as a topper for the other glazes to get that marbled burnt look.
the finalists
I ended up picking red clay because it seemed like I might get a better undertone with that as a base, and I think I was right! I ended up liking Carrot + Amber, Intense Red + Amber, and Citrus Splash + Amber (all above) more than the rest of the testers. I’m pretty new to layering glazes but I was pleased with these even if Citrus ended up a little wonky. For now, the plan if definitely to glaze the beads with the Carrot combo because I think that captured the orange tone the best.
beads + birdie charm
I will be very honest and vulnerable for a moment and tell you, cherished reader, that I made a truly abysmal first version of the owl charm. I had been making those tiny circle beads for two hours and I was so sick of having fancy mud on my hands that I did a poor job and ended up having to redo it later anyway because it looked so bad. This raw and emotional story (sarcasm) is an example of why it’s okay to take breaks, and how making art is so not worth it if you aren’t enjoying yourself (serious). I did a second pass at the owl charm for Athena and I’m much happier with it now. A lot of the delays came from having to expand the holes in every single bead because I poked them too small the first time and they would have closed after a bisque firing (because clay shrinks when you fire it!!). Rather than keep rushing through this week and risking a kiln explosion (I’m still explosionless for now, will keep you updated) by glazing and bisque-firing at the same time, I’ll be dipping these bad boys in glaze next week and tossing them in the kiln afterword.
I’ll be back here later to tell you more about the super exciting stuff to come, and I’ll hopefully have some history for you all about Mali and Burkina Faso!! Get hyped!
Hey team! We are back at it again with some more killer beads after a relaxing spring break hiatus. This month we’re looking at the great country of Greece and their traditional worry beads, also known as Komboloi beads. These beads are rumored to have originated in the grand mountains of Greece, made by monks and used for prayer as a precursor to the rosary. Almost like a beaded bracelet, a traditional Komboloi features an odd number of beads, usually any multiple of 4 + 1 extra, as well as a large charm that cinches the two ends of the string together.
These images from the Greek Komboloi Museum showcase the kind of structure I’m talking about, including an empty stretch of string for your funny little fingers. For my beads, I decided I wanted to make my charm a little more detailed to make up for the fact that I’m basically just making 22 copies of the same tiny sphere otherwise. For some inspiration, I looked up which Greek god is responsible for ceramic affairs, and lo and behold! It’s Athena! More generally known as the goddess of strategy, Athena is one of the coolest Greek gods and also Annabeth Chase’s mom.
Check out the gallery for some of the references I used drawing these plans!
In my research it seemed like these beads were typically made out of coral (reasonable for someone in the Mediterranean, not so much for Milo of North Carolina), but I thought I might pay homage to the other illustrious materials used for Komboloi by trying to make amber-adjacent beads!
I hope to get crackin’ on these beads this week and I can only pray that making an owl out of clay is not as hard as I fear it may be. See you all later this month with the results!!
While I was gone I embarked on a perilous mission to create homemade ceramics paint and constructed 9 whole red clay beads! Just in case you forgot, this month’s bead quest was inspired by ceramics from ancient Mexico. I took a leap of faith creating the slip paint for this project as well as making my very first pendants, and one of those was much messier than the other.
paint-making materialsa sliver of the true mud hurricanemilo’s white slip paint + pendants!
I cannot emphasize enough that my kitchen looked like it had been overrun by 7,000 muddy pigs. It was worth every second because I was ultimately successful but I would need a significant monetary incentive to try straining mud through a pasta colander again.
If you, dear reader, want to try making slip paint too, it’s actually incredibly easy! The method I used involved drying out a large helping of clay chunks of your desired color (the clay I used turns white when fired, but you can also add dyes if you need a different color). I then submerged the chunks in water and stopped pouring when the waterline was about an inch above the clay pile. After waiting for the water to start soaking into the clay, I started churning this stuff like butter. This part is by far the most taxing, and you will probably have to adjust how much water is in it a couple times while mixing to make sure the mud is actually liquid. Then, unfortunately, you have to pour the mixture through a strainer and into your desired container to make sure it’s smooth. This is not as physically draining as the mixing process, but I did feel despair surround my soul when I had to stick my entire hand into the goop.
After running the paint gauntlet, you can just use the mixture like any normal paint; just paint it onto your piece BEFORE bisque firing and send it in that kiln! Important to note that any streaks or lumps in the paint job won’t smooth out like glazes do when it’s fired, so paint carefully.
All in all I am absolutely thrilled with how these turned out, and I’m so pleased that my ridiculous plan to DIY slip paint actually worked! The white accents stand out exactly how I wanted.
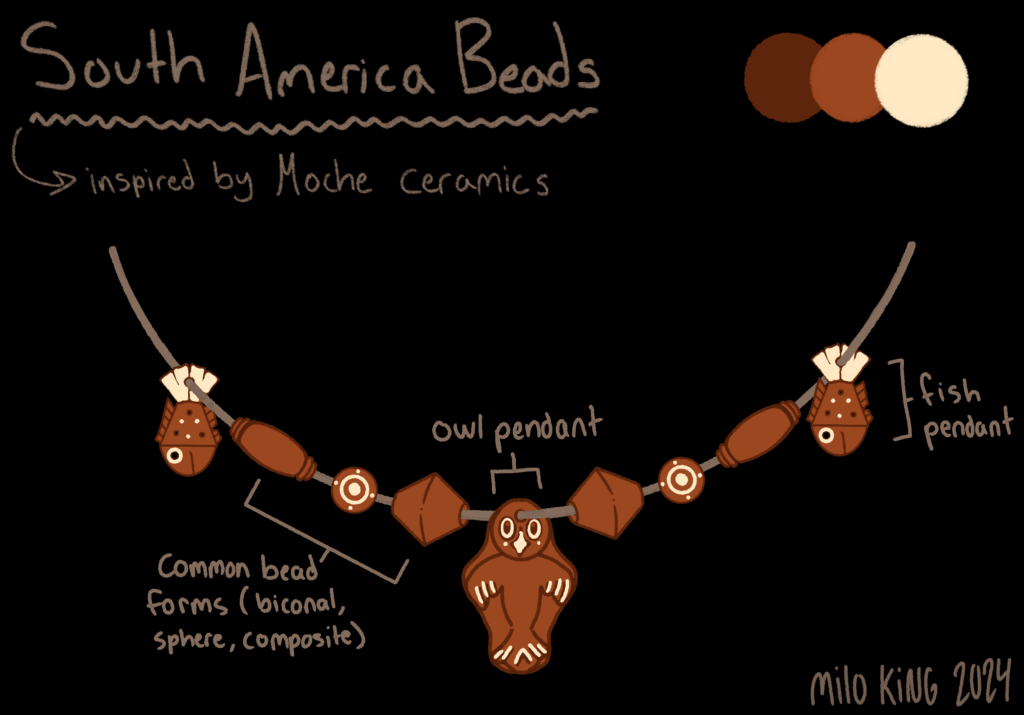
Alright everyone, here’s the plan for the upcoming week: by following my illustration (shown above), I will shape the beads, dry the beads, and paint the beads before firing them. The good news is that I only have to fire these beads once since the slip paint I’m going to be using doesn’t need a second firing. The bad news is that slip paint needs to be painted onto leather-hard clay, so I’ll have to tread a very delicate line between too-wet and too-dry beads when I paint them.
I chose the owl and fish pendants because they were too charming not to include in my final product, even if they do end up looking a little wonky because of how detailed they are. I’m not willing to tango with red slip paint, so I’ll be using white slip paint to embellish the pendants as well as to add decorative Moche patterns to my spherical beads. I’ll check back in next week with a progress update, see you then!
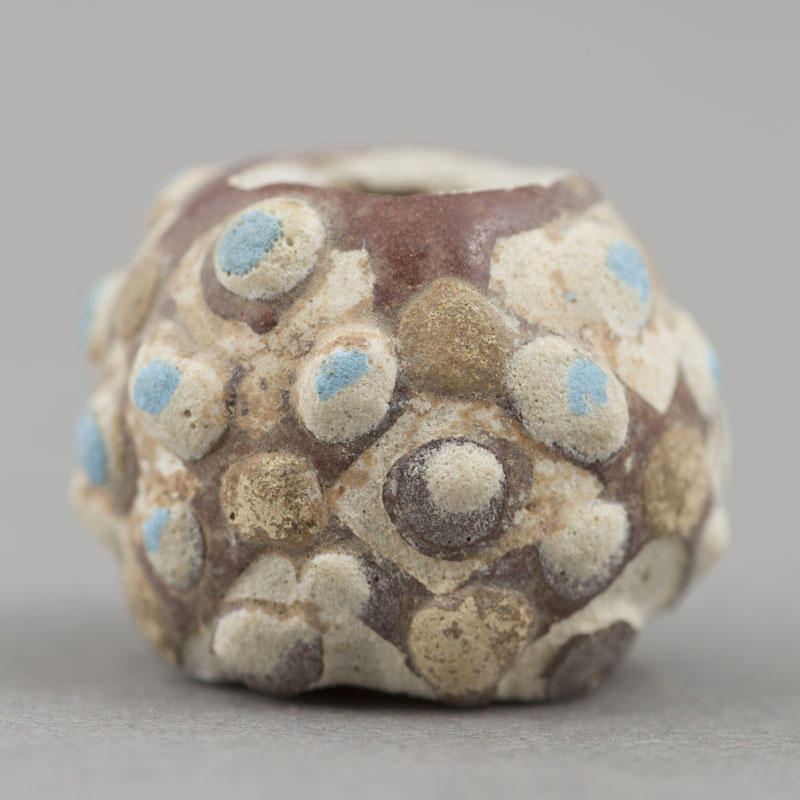
This February, we’re going back in time–even further than last month! The Moche people thrived between the 1st and 8th centuries CE in the expansive river valleys of coastal Peru, and they made some very impressive pottery. For my research, I primarily consulted Hélène Bernier’s “Personal Adornments at Moche, North Coast of Peru” (2010) to gather some references and descriptions of what ceramics these ancient Peruvians made and how they were used. I hope Bernier is out there somewhere, living her best life, because this paper was fantastic and exactly what I was looking for.
In her archeological research, she uncovered a wealth of ceramic artifacts (400+ beads alone!) that suggest ceramics were a major part of daily Moche life. Clay beads, vessels, sculptures, and charms were found in elite and non-elite homes alike; ceramics were for everyone! Bernier’s team even uncovered a ceramic workshop, dedicated entirely to ceramics production by hand and using molds.
Owl Pendants <3
She also analyzed the collection of pendants found at the site and noticed some trends: ceramic pendants tended to feature human figures, religious scenes, seeds, deities, animals, and crops. My personal favorite pendant type was the owls (shown above).
I also had the pleasure of reading Joanne Pillsbury’s essay on Moche ceramics for The Met, which revealed that the Moche used colored slip to paint designs on their clay– not glazes. In hindsight, this is probably what the Purépecha people used as well, but alas. Slip, which is essentially just clay and water blended together, can be colored and painted on to leather-hard (not wet, not dry) clay to create a more opaque and matte effect. I’ve never tried this technique before and I imagine it won’t be easy, but I’m excited to see how it will turn out.
As always, if you want to read any of the papers I referenced for yourself, check out the bibliography page. See you when I draft up my plans for this month’s string of beads!